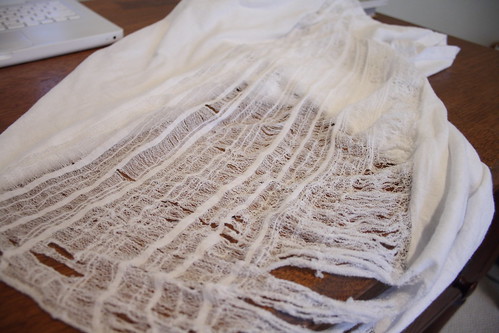
[childhood flames] DIY | the shredded tee
childhood flames: do-it-yourself: the shredded tee
Thank you Camille, for the great tutorial!
Finally, here it is! Sorry for the delay!

What You’ll Need:
-a t-shirt/tank top/etc. (I used a regular Hanes tee, the ones that come in a pack)
-scissors
-a seam ripper (optional, you could use a mechanical pencil or your fingers instead)
-lots of time

Cut the hem off your shirt and stretch the raw edge a bit to loosen the threads.


Using you seamripper (pencil or fingers), begin to pull at the threads running horizontal to the hem of the garment. (Note: Don't tear the threads, just pull them loose. You will see them unravel as you pull.) The first couple threads may break, but keep going until you have several threads loose. This is where you determine how wide your shredded section is going to be, so pull a long section of thread out if you want a wider panel of shredded fabric. Remember, you can always made more panels later on.

Once you have several threads pulled out you can ditch the seam ripper and just use your fingers to pull on the thread and more should rip out. Don’t worry if some threads break along the way, just keep pulling.

Continue ripping until you reach the top of the garment or the height you desire. If you notice that your shredded panel of fabric tapers in as you go higher, backtrack and find where you didn’t pull the thread all the way across and pick and pull at the spot until it comes undone and continue to the top.

Repeat and make multiple panels of shredded fabric until satisfied.
Thank you Camille, for the great tutorial!
Finally, here it is! Sorry for the delay!

What You’ll Need:
-a t-shirt/tank top/etc. (I used a regular Hanes tee, the ones that come in a pack)
-scissors
-a seam ripper (optional, you could use a mechanical pencil or your fingers instead)
-lots of time

Cut the hem off your shirt and stretch the raw edge a bit to loosen the threads.


Using you seamripper (pencil or fingers), begin to pull at the threads running horizontal to the hem of the garment. (Note: Don't tear the threads, just pull them loose. You will see them unravel as you pull.) The first couple threads may break, but keep going until you have several threads loose. This is where you determine how wide your shredded section is going to be, so pull a long section of thread out if you want a wider panel of shredded fabric. Remember, you can always made more panels later on.

Once you have several threads pulled out you can ditch the seam ripper and just use your fingers to pull on the thread and more should rip out. Don’t worry if some threads break along the way, just keep pulling.

Continue ripping until you reach the top of the garment or the height you desire. If you notice that your shredded panel of fabric tapers in as you go higher, backtrack and find where you didn’t pull the thread all the way across and pick and pull at the spot until it comes undone and continue to the top.

Repeat and make multiple panels of shredded fabric until satisfied.


0 Comments:
Post a Comment
Subscribe to Post Comments [Atom]
<< Home