6.21.2011

[childhood flames] DIY | the shredded tee

childhood flames: do-it-yourself: the shredded tee

Thank you Camille, for the great tutorial!

Finally, here it is! Sorry for the delay!

What You’ll Need:
-a t-shirt/tank top/etc. (I used a regular Hanes tee, the ones that come in a pack)
-scissors
-a seam ripper (optional, you could use a mechanical pencil or your fingers instead)
-lots of time


Cut the hem off your shirt and stretch the raw edge a bit to loosen the threads.


Using you seamripper (pencil or fingers), begin to pull at the threads running horizontal to the hem of the garment. (Note: Don't tear the threads, just pull them loose. You will see them unravel as you pull.) The first couple threads may break, but keep going until you have several threads loose. This is where you determine how wide your shredded section is going to be, so pull a long section of thread out if you want a wider panel of shredded fabric. Remember, you can always made more panels later on.

Once you have several threads pulled out you can ditch the seam ripper and just use your fingers to pull on the thread and more should rip out. Don’t worry if some threads break along the way, just keep pulling.

Continue ripping until you reach the top of the garment or the height you desire. If you notice that your shredded panel of fabric tapers in as you go higher, backtrack and find where you didn’t pull the thread all the way across and pick and pull at the spot until it comes undone and continue to the top.

Repeat and make multiple panels of shredded fabric until satisfied.

6.10.2011

Felting

Wet & Needle Felting

Felting websites:

http://www.ebsqart.com/artMagazine/za_287.htm pictures of bubble wrap felted fabric
http://www.gfwsheep.com/needlefelting/needlefelt1.html using felting needles to add decoration to felted fabrics
http://blog.craftzine.com/archive/felting/ great examples of felted projects & links to many creative sites

Felting supplies:  this is just to get you started-many, many sites online

http://www.fibervilleusa.com/indexday.html many “shops” in the Midwest that have banded together to create a cyber mall-also list fiber events in the area-good network

http://www.marrhaven.com/ excellent source for wool roving-link to Michigan Fiber Festival

http://www.mielkesfiberarts.com/ I have purchased from them at Michigan Fiber Festival-good prices, “Bag of Candy” samples of many colors

Process:

Felt is made when the scales that are on the individual wool fibers interlock with the application of heat and agitation.  Soap helps the scales open and interlock.  The process produces a non woven fabric with unlimited variations.  Felt can be made into flat fabric or 3 dimensional forms like hats or bags or solid forms like beads or sculptural shapes.

Fulling is the process of tightening fibers in an already created fabric and making them more compact-a controlled felting process that also results in shrinkage.  This can make knitted or crochet garments or objects have a surface that appears to be made of felt and creates a more stable fabric or in the extreme fabric that becomes hard and unusable as a garment .  Both of these processes are non-reversible,  so particularly when fulling a garment proceed slowly-you can control the amount your garment will shrink .

Fiber Preparation and Choice:

Fiber preparation & the type of fiber is key to the type of felt and ease of production.  Different sheep breeds and animals produce different quality fibers-choose the appropriate breed of animal for the type of felt you want to produce.  Generally if you want to produce felt without purchasing cards or a drum carder for combing the fiber it is easiest to use roving that is produced for hand spinners.  This is sold in a long, even, narrow  strand of carded fiber so that the fibers are running in the same direction.  Roving can be easily pulled apart to form the bats you will need to create larger pieces of felt.  These lengths of roving also come in a huge variety of colors, both natural and dyed that can take another step out of the process.

Types of Wool

Fine, soft wool makes fine, soft, compact felt.  Coarse wool makes thicker, hairier felt.  Shrinkage also will vary with the type of felt, so particularly if you are fulling a finished garment you need to test a sample before working with your garment.  If making wet felted fabric we can work more freely.

Merino is probably the most commonly available wool for felting and easily produces a soft, compact felt.  Other fibers can be blended or used on the surface of the felt to modify the appearance.  Corriedale is very similar in appearance & works well.

Angora can be blended to create a soft halo effect-these fibers can be hard to handle because of static so you may want to use a spray bottle to mist them as you work with them.

Silk fibers do not have scales to interlock, but if placed on top or held in place with thin layers of wool they can be added for luster.

Mohair fibers are harder, with longer, flatter scales that do not lend themselves to felting, but again may be used with wool to hold them in place.

Llama and alpaca will both felt and is sold in the natural colors of the animal-so shades of cream and brown.

www.besweetproducts.com
Pebble Carpet : made of 100% merino wool. designed by Ronel Jordaan in Johannesberg, South Africa, and made by women in a successful job creation program, this floor decor piece is made of hand dyed, carded and felted pebbles that resemble real rocks from nature and are then attached with thick durable cord.  standard sizes are 50x50cm OR 60x65cm. custom sizes available. colors vary in each carpet (natural creams, grey tones, brown tones, and charcoals).


Step 1.  If you want to design a shape-make a pattern from bubble wrap,  with the
               bubbles to the inside.

Step 2.  Layer your roving (pulled off in thin tufts).  Layer one with fibers running in the
               same direction, layer two with fibers running perpendicular.  Repeat layering
               in alternating directions until bat has reached desired thickness.  For a solid
               fabric with good density this would probably mean 8-10 layers.  This will vary
               depending on how you pull and place your tufts, but more,  thin layers
               alternating will create a more stable fabric.

Step 3.  Pour, or if creating small pieces like beads-dip, soapy water mixture.  Any type
               of soap may be used, but because your hands will be immersed in the mix I
               like to use liquid dish soap or liquid hand soap since they are gentle to the skin
               and I do not have to wait for a bar to dissolve, but bar & laundry soap also work

Step 4.  Begin rubbing or rolling (for beads).  If you plan to join a front and back piece
               together do not felt to the outer edges of the piece, but leave a 1 1/2” fringe
               around the edge that you can then layer with the other side and then felt the
               pieces together.

Step 5.  Continue rubbing, pounding agitating until the piece reaches the desired
               consistency-the more you pound the firmer your fabric.  The finished piece
               can then be rinsed with cool water, rolled in a towel to remove excess moisture
               and left to air dry.

If any areas of your fabric are thin you can add extra fiber using a needle punch tool or needle.  Without the needle it will be very difficult to get two pieces of felt or extra fiber to join together.


Labels: , , , ,

Resist Dye: Shibori, Tie Dye, Ombre

Resists prevent dye or paint from penetrating fabric.  This protects the current color of the fabric.  For example if you start with white fabric the area that is protected will remain white.  There are a variety of resists available depending on the effect you are trying to achieve.

Mechanical Resists:  may include a variety of waxes, starch, glue, or gutta to form a barrier that prevents dye penetration.  Some of the ways these resists can be applied are by brush, stamp, screen or stencil.  After applying the resist and dye in alternating steps the fabric is set and the final step is to remove the resist from the fabric.

Physical Resists:  use binding, clamping, wrapping, stitching, knotting or folding to prevent penetration of dye, paint or chemicals into the fabric.  This technique includes tie-dye, shibori (Japan), plangi (Indonesia), bandhani (India).  The result of these techniques gives a distinctive blurred edge between the dyed and resists areas.  After applying the resist the fabric should be soaked in plain water to swell the fibers before dying to help in the resist process.

Now we will be working with physical resists, later when we are painting on silk we will be using mechanical resists.

Suggestions:
            1.  Bound Resists:  fabric is knotted on itself or pulled up and tied with string,
                        rubber bands, elastic or cord.  Small beads, buttons or other objects
                        can be tied up to create a pattern.
            2.  Clamping:  fabric is folded in two or more directions before clamping between
                        wooden blocks.  The size and shape of the block and method of folding
                        determine the pattern created.  These patterns are easily reproducible.
            3.  Pole Wrapping:  in this technique fabric is wrapped around a pole or pipe,
                        wound with string, then pushed down to compress and resist.  The fabric
                        can be wrapped straight, at an angle, in layers or as a sewn tube
                        depending on the desired effect.  Dyes can then be dripped, painted or
                        poles can be immersed in dye pots to color the fabric.
            4.  Shibori/Stitching:  hand or machine stitches are gathered very tightly to form
                        the resist.  Stitches can be made in flat or folded fabric.  The thread should
                        be strong enough to be pulled tight.  A heavier thread like buttonhole twist,
                        carpet thread, crochet cotton or waxed thread are better than regular
                        sewing thread.

All of these techniques may also work in the reverse if starting with a colored fabric and then using a discharge to remove color in the areas not reserved by the resist technique.


A few stitching techniques:


Test #4 Resist Dye

Materials:     Tied, Clamped or Sewn Fabric Samples Labeled to identify
                        Water
                        Dye Stock
                       
Technique:  Soak samples in plain water before adding to dye bath (10 min. or so) to aid resist
                                   
Add fabric and stir occasionally for 10-30 minutes(longer time=darker color).
After 30 minutes remove fabric, rinse until water is clear and dry.  You may remove the resist materials before drying.

You may also want to try using two or more colors by retying or reclamping and putting your sample into a second color.  These techniques are very effective when using color remover between colors.
Record your results and mount your fabric samples in your technique book.
Test #4 Ombre

This is a French term meaning “shaded” or gradated in tone.  This may be accomplished by going from light to dark or tone to tone. 

            To go from light to dark:  prepare your dyebath, add fabric and quickly remove the first few inches (this all depends on how and where in a garment of fabric you want the gradation to begin) and continue to slowly pull the fabric from the dye.  If the color is not attaining the depth of shade that you require it may be necessary to add more of the dye.  The other option is to slowly lower the fabric into the dyebath, but it is harder to see the results.

            To go from color to color:  there are many ways, but basically prepare two dyebaths, add each end of the fabric to one dyebath and in the middle shift the fabric back and forth between the dyebaths to create a blended color.

This technique will work with many types of dye and appropriate fabrics.  If you are planning a garment and want the placement of the ombre in a specific location it may be necessary to cut the garment and partially sew before dying (for instance:  you want the dye line on the sleeve to match placement on the garment and front and back to match precisely).  To get a softer blend on large pieces of fabric it would be beneficial to wet out the fabric before dying to slow the absorption of dye.

Labels: , , , ,

Stamping, Stenciling and Silk Screen

Block Printing-Stamping

Block printing is one of the earliest forms of printing.  By 400 BC India was exporting fabrics to China and by the Middle Ages trade was established in Europe.  As the printing method developed commercially the blocks were made in different wood for different purposes.  The  design stands out in relief on the surface of the block, with a different block for each color of the design.  The block is pressed onto an inked plate or pad and the applied to the fabric surface. 

When designing for a block print or stamp remember that whatever is raised off of the surface is what will print-it is a very direct form of printing.  You can design your print to have different colors, but think about how you will register (line-up) the designs.  This is particularly useful  for adding texture or random pattern to fabrics.

Stenciling-Silk Screen

Stenciling begins with cave painting and prehistoric man placing his hand on the wall and blowing color on and around it leaving the negative image of his hand.  Through the centuries many forms of stenciling have been used, but the invention of paper by the Chinese created an easy material to use when cutting stencils. 

When designing for a stencil remember that what you cut away is what you will see in your design.  Stencils are somewhat easier to register, especially with the clear plastic that many stencils are cut from.  You can make multiple stencils that work together to create a design, each with its’ own color or you can paint multiple colors on different openings of one stencil.  Remember when using a stencil brush the color from the edge to the interior to prevent color from bleeding under the edge of the stencil.  Part of the charm of block printing and stenciling is the fact that they look hand made-don’t fight the process, but use it to your advantage.  The unique look and texture of these processes should be considered a selling point in a mass production society.

If you want or need to have crisp lines, text, photorealism then you should use silk screen.  The process can be as simple as a paper stencil applied to a screen (usually good for 20 to 40 prints) to commercially prepared rotary screens that can print thousands of yards.  We will explore the low-tech end of silk screen-something you can do easily at home.  If you want to have a more complex design, but do not have the equipment to expose a photo screen there are silk screen shops in every large city that will make screens for you with your art work.

Again when designing for silk screen what you take away from the design is what will print.  Color separation (dividing the design into different color areas) is necessary since you need one screen for each color printed.  There are a lot of tricks to designing repeats and line ups in silk screen, but we are going with a basic paper block out.  If you build your own screens you can use a lacquer film bloc, paint on block out like varnish or shellac or commercial block outs.  I find it easiest to use commercially available water based pigments for printing, but thickened procion dye works well also-it is just more work mixing the colors and they cannot be stored and used as long.

Remember these techniques (Stamping and Silk Screen) are opposite of each other in how they print.
Silk Screen prints what you cut away and Stamping prints what you leave.  With silk screen lettering is cut out as you want it to read, with stamping lettering must be reversed to read properly.

Test #6- Stamping

Try some of the wooden blocks or foam stamps that we have available and create one of your own using the self stick foam and foam backing.  You can make any size or shape and multiple stamps if you like.  The advantage to stamping is freedom of alignment and being able to flip and rotate your motif.  Remember whatever is raised off of the surface is what will print.  You may also make stamps from found objects, vegetables, textured surfaces-anything that is a relief surface that can be pressed onto a surface after being inked.

1.  Using a stamp make a record of the basic networks on paper:  Square
                                                                                                                    Brick
                                                                                                                    Half-drop
     4” X 4” minimum- cut out mount & label on page                           Diamond
                                                                                                                    Herringbone
2.  Using a stamp investigate some of the possibilities on fabric.
            A.  different networks/directional or nondirectional prints
            B.  flip and rotate
            C.  voids/packed/spaced                 Tip: remove up to 50% of your shape &
            D.  random/tossed                                   keep one edge straight if you want a rigid
            E.  over-printing                                      alignment-it will help you to register your print.
            F.  change in interval/stripes
            G.  hue/value/intensity (color experimentation)

Caution:  The pigment we are using is water based and will not harm your skin, though I would not put it in my eyes, but it is a textile pigment that works well on cellulosic and because it is a pigment also works on polyester.  Why am I telling you this?  Because your clothes will be permantely stained if you get it on them-it will not wash out even if you use bleach.  One of the tings to learn when working on fabric with dye or paint-No matter how messy the process looks you need to control it and be neat or you can ruin yards of your fabric or someone else project.
Record your results and mount your samples in your technique book.

Test #7- Silk Screen

Create a freezer paper design that you can apply to the silk screen (the ink will hold it in place).  If you have floating shapes be sure to keep them to apply to the screen, they can be held temporarily in place with tape until the ink adheres them to the screen. 

If you have multiple colors in your design you will have to cut an individual paper for each color you want to print(color separation).  The appearance of having multiple colors without cutting multiple screens may be achieved by “split fountain technique” or multiple colors in one screen.  These colors will blend and form new combinations of color.

Record your results and mount your samples in your technique book.

You may bring in your own T-shirt or other item to screen.  If it is a thin jersey place a piece of newspaper between the layers to prevent bleed through.  The ink we are using is good on 100% cotton or cotton poly blends up to 50-50.  After dry, iron on high with no steam on the print for 2-3 minutes to set the color.  It is then machine washable.

Test #7B- Stenciling

Create a stencil design by cutting from heavy paper or thin plastic sheets.  Ink, devore paste or other block outs may then be applied using a brush to transfer the pattern.  Remember to brush from the stencil into the cut area to prevent pushing ink under the stencil.  Stencils may be used repeatedly if wiped and allowed to dry.

All of these techniques may be used in combination and in a variety of ways to create the desired look

Labels: , , , , ,

Devore/ Burn out

Devore is French for devour and that is what this process does.  The chemical used will devour or burn out the cellulosic fibers in a blend or create a “cut-work” design on 100% cellulosic fabrics.  The process is very simple when using the Fiber-Etch® Fabric Remover.  This product is available from Dharma Traders or the manufacturer www.silkpaint.com.

Method:
            1.  iron wrinkles out of your scarf so that it will lay flat
            2.  pin the scarf to newsprint or brown paper to hold in place & soak up any excess
3.    apply a thin layer (not raised) of Fiber-Etch get on the area to be removed.  Gel
     may be spread by “scratching” into the surface with the bottle or brush (stencils are very         effective with this technique*).
            4.  Dry with a hairdryer
            5.  Iron (without steam on high heat) on reverse side of the fabric.  It will not stick to the iron or to the ironing surfaces, but if you cover the ironing surface with tin foil the process will go faster.  Do not overheat (causing very dark brown patches).  When Fiber-Etch area becomes brittle rinse under running water to remove fiber bits from scarf.
            6.  Record your results.  We will be dying or painting your scarves at a later date

*Cut a stencil design from pattern paper that you can use a brush to apply fiber etch to the fabric.  Remember with a stencil whatever you cut away will be your print.  You can also use edges as a stencil to create stripes, or pieces of a stencil to create new designs when linked or overlapped.

Caution:Fiber-Etch is irritating to skin and eyes so be careful when using.
           
Alter Ego Dyeing Instructions
The dyes we will be using are a mixture that will put one color on the silk (sheer) area of your scarf and another color on the opaque rayon portion of your scarf.
  1. Put Lukewarm water in a saucepan.
  2. Add the two colors (silk and viscose), the fixative, the vinegar, and the cooking salt. MIX WELL!
NOTE: The colors will be mixed in the water but they will separate again on the fabric.
  1. Rinse the fabric in lukewarm water, squeeze it out and while still damp put it in the saucepan (the salt will not dissolve completely).
  2. Put the saucepan on low heat and stir during 5 minutes in order to homogenise the dyes, then increase the heat up to boiling for 20 minutes.
Turn the heat off and leave to stand for 10 minutes.
  1. Rinse under running water and then wash in lukewarm soapy water. Finish rinsing in clear water and squeeze out the fabric.
Scarves, Fiber Etch and Dyes are available from Dharma Trading Company www.dharmatrading.com

Labels: , , , ,

Stenciling + Silk Screen Prints

Stenciling begins with cave painting and prehistoric man placing his hand on the wall and blowing color on and around it leaving the negative image of his hand.  Through the centuries many forms of stenciling have been used, but the invention of paper by the Chinese created an easy material to use when cutting stencils. 

When designing for a stencil remember that what you cut away is what you will see in your design.  Stencils are somewhat easier to register, especially with the clear plastic that many stencils are cut from.  You can make multiple stencils that work together to create a design, each with its’ own color or you can paint multiple colors on different openings of one stencil.  Remember when using a stencil brush the color from the edge to the interior to prevent color from bleeding under the edge of the stencil.  Part of the charm of block printing and stenciling is the fact that they look hand made-don’t fight the process, but use it to your advantage.  The unique look and texture of these processes should be considered a selling point in a mass production society.

If you want or need to have crisp lines, text, photorealism then you should use silk screen.  The process can be as simple as a paper stencil applied to a screen (usually good for 20 to 60 prints) to commercially prepared rotary screens that can print thousands of yards.  We will explore the low-tech end of silk screen-something you can do easily at home.  If you want to have a more complex design, but do not have the equipment to expose a photo screen there are silk screen shops in every large city that will make screens for you with your art work.

Again when designing for silk screen what you take away from the design is what will print.  Color separation (dividing the design into different color areas) is necessary since you need one screen for each color printed. 

http://www.printcutsew.com/wp-content/uploads/2009/01/film-positive-3-colour.jpg

If you build your own screens you can use a lacquer film bloc, paint on block out like varnish or shellac or commercial block outs.  Additional ways of creating your design would be to create a black/white image in Photoshop or Illustrator and print on an acetate sheet to make your blockout for a photo screen.  Photo screens may also be exposed with ink drawn directly on acetate. I find it easiest to use commercially available water based pigments for printing, but thickened procion dye works well also-it is just more work mixing the colors and they cannot be stored and used as long.


Supplies you will need:

Padded Print Board-generally any slightly padded surface will work.  With the type of ink we are using I like to have a surface at least 24” x 24” padded with an old blanket, quilt batting, polar fleece and then covered with a smooth vinyl.  You can get upholstery remnants cheaply.  If I am printing sleeves I make small pads to fit inside the sleeve and stretch it.

Inks- We used Nazdar Aqua Set Inks in class.  These are available through dealers-I purchase mine at Chicago Silk Screen Supply on Milwaukee.  I like these inks because they have a soft hand, excellent wash fastness, the colors are easy to mix, but they are transparent, which means that you cannot print light colors on black with these colors.   These inks work on 100% cotton or 50/50 cotton/poly blends.  Versatex and Speedball also make inks that are available from Dick Blick.  I find that these have a shorter working time and dry in the screen.

Most of these inks also have an extender base available-this is used to create light colors and also may be used to “extend the color” or thin the ink without changing the color.  These extenders are cheaper than the inks and are used to lower your cost of production.


Silk Screen-   Wood-1”x2” are good unless you get into larger size screens, then I would go to a 2”x2”
                        Screen mesh-110 mesh is a basic size to use for textile printing
                        Staple gun/staples-staple on an angle
                        Duct tape-to block the edges of the screen after you apply your design(to keep ink from leaking around the edges of the design
                        Varnish(if desired)after you build your screens if you varnish the wood it will make
the screen easier to clean.

Squeegee-these come in different sizes and types, almost any will work for textiles it is more a personal preference.  Square edge, rounded-you may purchase them by the inch for specific screens, they should be longer than your printable area so that you do not get streaking.

Block Out Material for design-
                        Paper-we used a wax backed freezer paper available online from paper suppliers or you can use a “heavy weight brown paper” if it is light weight it puckers when it gets wet.  The freezer paper should be used with the shiny side up.
                        Ulano Stay Sharp Laquer Screen Film & Adhering liquid
                        Photo Emulsion

Many other types of block-outs are available, what you want to consider is whether you want to use the screen without restretching new screen mesh or if you want this to be a long-term use screen.  If you are doing a short run of prints, 20-40 and never plan to repeat the design it makes sense to try and use a block-out method that does not tie up the screen.  If this is a design that you plan on repeating time after time, or year after year-then invest the time and money in making a dedicated screen.

Other block-out materials: liquids painted directly onto the screen and allowed to dry (varnish, commercial mask), found materials (leaves, string), contact paper, tapes, ect.


Silk Screen Supply List

Dharma Trading Co.                         Dye for cotton, silk, blank scarves in silk
P.O. Box 150916                                          and velvet for devore.  Fiber Etch for devore,
San Rafael, CA 94915                                 Gutta for silk resist, squeeze bottles
www.dharmatrading.com                       

Chicago Silk Screen Supply Co, Inc.          Will make screens, will order printing ink in
882 N. Milwaukee Ave.                                gallon size ( we used Nazdar Aqua Set )
Chicago, Il 60622                                          some colors available as quart size
312-666-1213                                               also photo screen emulsion, squeege’s


There are many online sources for screen printing materials Standard  seems to have everything and they will make screens for you as an online source

Dick Blick Art Materials                                They carry a line of fabric inks that can be used
Around town and online                                for silk screen and they have materials to make
                                                                        stamps and also carry stamp ink that is thicker
                                                                        than the ink we used.

www.Blankshirts.com                                   Good prices on t-shirts

www.ulano.com                                             Information on silk screen & laquer film products

Books:

Complex Cloth by Jane Dunnewold:  basic book that covers many techniques in a “low tech” way

The Surface Designers Handbook by Holly Brackmann: basic technique book

Labels: , ,

Silk Painting

Silk Painting
 The Serti (closing or fence) technique is the silk painting technique where designs are formed with gutta or water-based resists, which are applied to white silk that has been pre-washed, dried and stretched (on a stretcher). Once the gutta or water-based resist has dried, it acts as a barrier for the dye or paint—keeping the color within the outlined areas of the design and allowing you to achieve sharply defined borders. (Without this barrier, the dye or paint would flow into more of an abstract, undefined pattern.) After the dye or paint has been properly set, the clear gutta or resist is removed and a defining line the color of the original fabric remains. Colored guttas and resists are also available that are meant to remain in the fabric.
GUTTA SERTI METHOD

GUTTA is a rubber- like resist. It can be applied with a squeeze bottle with metal tip, a brush, or sponges. Try to keep your hand steady and apply smooth lines directly onto the silk. If there are any breaks in the resist, the dyes will bleed through. Make sure the gutta dries to tacky before adding dyes. It will flatten slightly and loose it's sheen when it is dry enough.

Because the resist is clear, the lines you make will be the color underneath, in this case white. If you use a brush or sponge, clean immediately with turpenoid and brush cleaner.


Watercolor-like effects can be achieved by applying dye or paint to silk that has been pre-washed and put on stretcher bars whether or not you are using resists (but not if you are using stop-flow). Dyes or paints are applied to the silk with a paint brush, mist sprayer, eye dropper, or other tools to achieve abstract effects. Spraying the silk lightly with water before adding color increases the flow of the dye or paint. Sprinkling salt on the piece when still wet, and leaving till completely dry before brushing off the salt, produces interesting textural effects. Applying alcohol to dye-painted silk also creates beautiful effects.  For gutta
using even pressure and a steady hand while holding the applicator bottle vertically with the tip touching the silk, draw on your resist lines. Be sure that there are no breaks or gaps in the line (or dye or paint will escape!). Check the back side of your piece to make sure the resist has penetrated all the way through. If it hasn't, you will need to apply resist to the back side as well. (This is sometimes necessary when working on silks heavier than 12 mm. Let the resist dry (you can speed up the drying time with a blow dryer, or heat gun) before painting.

Dip your brush into the color and apply the dye or paint sparingly to the center of an outlined area by touching the brush to the silk. Let the paint move to the resist line – do not apply the paint too close to the resist (if water-based resist becomes too saturated the line may begin to dissolve!) If there is a gap in your resist line that you didn't notice and the dye or paint starts escaping, you can stop the movement by drying it quickly with a hair dryer and then patch up the line with gutta or resist and let dry before resuming. When painting large areas (e.g., background), work quickly, applying wet to wet to avoid unwanted lines.
Salt attracts moisture and will drag the dye as it dries. Apply your dyes QUICKLY. Randomly toss the salt. The silk should be very wet for the technique to work. Do not let the dyes begin to dry or you will get a line. Colors will dry lighter than they look while wet.

As salt attracts moisture, alcohol repels it. Alcohol can slow and also stop the flow of the dye. It can also be used for very subtle blending and can remove ( discharge ) controlled amounts of dye.

 Setting the color
When you have finished applying the dye or paint to the silk yardage or scarf, it's not permanent until you "set" or "fix" the color so that in the future you can wash or dry clean the piece without all the color washing out. The method of "setting" or "fixing" the color depends on the chemistry of the dye or paint you are using. Before purchasing any dye or paint, you should read the directions thoroughly to determine if the required procedure fits your project and situation.

Setting dyes with steam
Of the two methods for setting silk dyes, the steaming method produces the most brilliant colors.  During the steaming process, the heat and moisture penetrate the dyes to create a concentrated dye bath, which bonds the dyes to the silk.  

After the silks are steamed they should be rinsed with Synthrapol ( soap ) to remove any excess dye. Do not panic when you see dark dye flowing into the sink. The rinsing just removes any dye that didn't bond. Keep rinsing until the water flows clear. Towel dry and allow to dry flat.


Removing clear gutta or clear water-based resist
Once the dye or paint has been properly fixed, it's time to remove the gutta or resist. Clear gutta is removed by dry cleaning. If colored guttas have been used, do not dry clean (the color will come out with the gutta)! They are meant to leave on the silk. There will be some "hand" or "feel" on the silk. Some people prefer to use the colored guttas on wall hanging pieces only, rather than on wearable art.

Sources for more information on silk painting:
www.wetcanvas.com/Articles2/17813/328
www.dharmatrading.com/silkpainting

Test #8 –Silk Painting
Using whichever technique or combination of techniques you would like, do some test samples of silk painting.  You will notice that each type of silk fabric will take the dye differently.  If you were going to use this technique on fabric for a garment you would need to do tests to make sure that the dye reacts the way you wish on that particular fabric.  The scarves we will be painting are a silk crepe.  Paint your scarf.  When dry I will take it to steam set.
            Possible techniques:             1. gutta resist outlining (clear or black)
                                                            2.  water color effects
                                                            3.  salt application
                                                            4.  alcohol application
                                                            5.  dye moving on plastic surface (tye dye or crystal effect)
Record your results and mount your samples in your technique book.

Marbling Fabric

Test # 11 How to Marble a Fabric

Materials:
            Marbling Tray-long and wide enough to accommodate the pieces of fabric
                        you will be using.
            Carrageenan-for size
            Alum-for pre treating fabric
            Blender
            Acrylic Paints
            Cotton or Silk Fabric
            Eyedropper
            Rakes, combs, sticks for manipulating paint
            Newspaper

Technique:

Fabric Preparation: 

            Proportions: 2 Tablespoons Alum to 1 Quart water
Stir alum into warm water until crystals are dissolved.  Drop cloth into alum mixture.  Wear gloves (alum can cause a skin rash).  Stir cloth to make sure it is thoroughly soaked.  Wring fabric and hang to dry.  Press using a cool to medium setting on your iron.  Alum is destructive to fibers, so only prepare the amount of fabric you will be using or rinse out the unused fabric(you can store treated unused fabric for 3 months or so with no bad effects).

Marbling Size:

            Proportions:  In a blender 1 Quart water to 1 level Tablespoon carrageenan, blend
30 seconds and pour into container with an additional quart of water. (Total 2 quarts per Tablespoon of carrageenan).  Pour into marbling pan and repeat mixing steps until the pan contains about two inches of medium.  In order for the size to mature, it must rest undisturbed for twelve to fourteen hours.  Cover pan to keep free from dust.

To Marble:

            Skim size with piece of newspaper to break surface tension.  Apply paint to surface-if paint sinks to bottom of size either thin the paint or drop from closer to surface of the size.  After applying paint colors they can be swirled with stick, or moved with rake or comb.  When happy with the design lay fabric gently on surface of size from center to edges.  Gently press out any air bubbles caught under fabric.  Lift fabric, rest on newspaper and rinse in cold water.  Hang to dry and let “rest” for at least two days and then set the color by ironing on the wrong side.

To continue printing clean the vat to remove any color remaining on the surface with a strip of newspaper.  Marbling size can be kept and reused, but will develop mold after a few days.  It can be refrigerated, but needs to come to room temperature before it is used again.

Jt2009


Fabric Choice & Preparation

In general, fabrics containing natural fibers will provide the best results. Cottons and silks are good choices.
Anything you plan to marble must first be treated with a mordant - a paint/dye fixative. For marbling, we use crystalline alum, available from many supply houses.
Mordant makes it possible for paints to adhere to the surface of your cloth. Without it, most of the paint would wash off during the rinsing process.

Textile Preservation -- Alum is Caustic

Most quilters are concerned about the life-span of fabrics used in their quilts. Alum is an acidic, corrosive product which will cause cloth to rot if allowed to remain in the fibers. It is extremely important to marble your fabric within one week of its alum treatment, sooner if possible. I try to use fabric within one day of its alum treatment.
After your marbled pieces are heat-set, be sure to wash them thoroughly to remove all traces of alum.

Steps for Using Alum (Wear Gloves)

1. Mix 3 Tablespoons of alum per quart of hot water (alum is usually difficult to dissolve in cold water).
2. Stir thoroughly to dissolve and allow to cool.
3. Place pre-washed cotton cloth in alum solution. Squeeze through fabric to make sure all cloth is wet and allow to soak for approximately 6-7 minutes.
Many books recommend you let fabric soak for 30 minutes, but that length of time is not really necessary for quilting cottons or silk. In general, the heavier/coarser your fabric - the longer you should soak it. Try 5 or 6 minutes for most quilting cottons.
4. Squeeze/wring fabric pieces to remove as much alum as possible. Line dry or place in dryer. If you line dry, make sure fabrics do not fold back onto themselves as it can cause an unevenly mordanted surface. Silks must be air dried, do not place in the dryer.
5. Iron pieces and cut to proper size for your tray.

More Considerations for Textile Preservation

When you've rinsed your pieces, but before they are washed, remember that there are still traces of alum in them. When you heat set by iron, part of the alum will transfer to the ironing board cover. If allowed to remain, the cover will eventually rot, but more importantly, if not washed out, traces of alum could be transferred to other fabrics ironed on the same board. Wash the cover after each marbling session. I like to use a heavy piece of fabric on top of the ironing board cover, to help absorb some of the alum, and to shield the cover from unset paints that might rub off during the setting process. Another alternative is to have an extra cover that is reserved only for marbling chores.

Marbling Paints

There are many acrylic paints available specifically for fabric marbling. A few brands are Deka, Jacquard, Setacolor, Createx and the series developed by ProChem. Although they are more expensive, the absolute best paints I've found are Golden Artist Colors. They are easy to float, so easy for a beginner to use. The colors are vivid, but realistic.
When you marble with metallic paints, the flakes generally sink into the size during the combing process, so do not make contact with the fabric. If you would like for your fabric to have a sparkled look you might consider spraying or sponging on an iridescent paint after the piece is marbled.

Mixing Paints

Paints must be thinned to the consistency of light cream. Use distilled water to make longer-lasting solutions. Pour the paint directly into a cup or spout tipped bottle and add an equal amount of water. This dilution is usually a good starting point. Place a drop of paint onto the surface of your prepared size. Does it spread into a circle, or does it sink? If it sinks, add water to the paint (a little at a time) and re-test until the paint spreads when dropped onto the size. Test each color in the same way, alone at first, and then together.
You'll notice that consistency within the same brand of paint will probably vary by color. Some will need more dilution than others, perhaps as much as 3 parts water to 1 part paint. Adding too much water will weaken the color, and will also cause the paint to spread into very large circles. This may or may not be the look you want. Opaque paints can be a bit temperamental, sometimes not spreading as readily as others. Below are a few notes that may be of help.
--Small plastic cups are handy to dilute paints or mix custom colors. Pop an eye dropper or plastic pipette into each to bypass using a squeeze bottle.
--Whisks are an alternative to eye droppers and bottles. Gather lengths of broom straw into 1" diameter bundles. Use rubber bands or heavy string to hold them together. These whisks can be dipped into the paint, then tapped to release droplets onto the size. Whisks are a great way to drop small amounts of paint onto the size.

Marbling Tools -- Making Combs & Rakes

Two basic marbling tools are a rake and a comb. Each can be constructed with a strip of balsa wood, segments of a yard stick, or other strips of wood. A rake generally has widely spaced teeth. A comb has teeth spaced closer together.
To make a rake, cut one wood strip slightly shorter than the inside length of your tray, and draw a lengthwise line down its center. Drill or punch small holes at 2" intervals down the line. For teeth, insert a plastic curler pick or thin nail in each hole. If teeth are loose, secure using a glue gun or other type of waterproof glue.
To make a comb, draw a lengthwise line down the center of the remaining wood strip. Mark 1/4" intervals along the line, and insert long, sturdy straight pins into the wood at each mark. Heavy T-headed pins work well. One-quarter inch is a commonly used spacing, but remember that teeth can be spaced at any interval you prefer. Consider too that thicker teeth will create a more predominant path through your size when paints are combed. Those of you who want to marble extensively will probably make a variety of combs and rakes in sizes to fit the length and width of your tray. Commercial combs are also available.
For freehand designs, use a hair comb with wide teeth at one end and a sharp 'rat- tail' at the other. Knitting needles, an ice pick or other similar tools can also be used to create freehand forms.
If you're working alone, you'll need to construct a set of "helping hands" to lower the fabric onto the size. Cut two dowel pins slightly shorter than the width of your fabric. Secure a straight pin at the ends of each with rubber bands or electrical tape. Pins should be positioned with their sharp tips extending just past the dowel ends, so you can attach the two comers of your fabric to each dowel.

Trays

Plywood trays are easy to make if you are handy with a saw and hammer. Seal the tray with a few coats of clear or white acrylic. When completely dry, fill with water and allow to sit for a few days to leach out any impurities - and to make sure the tray is waterproof. The books mentioned in the source list at the end of this pamphlet contain tray-making instructions.
Check discount houses and supermarkets for ready-made trays. The trays used to develop large photographs are great. Seedling trays, storage bins, dishwashing tubs - any fairly shallow container will work.
If you decide to marble extensively, professional trays and combs are available from Colophon Book Arts in Seattle.
©1996, 1999, Janet Wickell

The Marbling Process

The size is cured, the fabric is treated, tools are ready, and the paints are mixed. You're ready! Make sure you have plenty of newspapers handy, you'll use them to soak up excess paint from the size after each piece of fabric is marbled. A bucket of warm water will be handy too, unless you have a sink nearby. If you're working alone, attach a piece of fabric to the dowels and set it aside. Be careful not to splash water onto your treated fabric, because moisture will diminish or eliminate the alum, leaving you with white or faded spots on your fabric.

Manipulate the Paints

The surface of your size has probably developed a thin skin, which must be removed before paints are placed on it. Drag a piece of newspaper across the top of the size. If bubbles develop along the sides of the tray, crush by pressing them against the tray with crumpled newspaper, or touch them with a small dry object, such as the head of a pin. Begin applying paint to the size, using whisks, eye droppers, and/ or bottles. Color can be applied randomly, or layered in rows across your tray. The choice of color and placement is yours alone. Do keep in mind that colors laid on the size first will intensify as new colors are placed on top of them, and that the last color to be applied will be the most predominant in your finished piece. In general, try to place contrasting colors next to each other, as you do when piecing a quilt top. Unless they are combed excessively, paints will not blend together to form new colors.
When you're satisfied with the color and arrangement on top of the size, it's time to print the fabric. Refer to the illustration below, using your rake to make the "get gel" pattern.
1--Place your rake in the size at the top of the tray and pull it toward you (some of the teeth may extend on either side of the tray).
2--Push the rake back away from you, making sure the path of the teeth is midway between the patterns left by the first pass through the size, as shown in the drawing.
3--Place the rake in the size along the right side of the tray and push it toward the left side of the tray.
4--Make a left to right pass in the same manner, again making sure the path of the teeth is midway between the patterns left by the right to left pass.
You've just created the get gel pattern, which is the pattern you see on the background of this page. It's a great pattern in itself, and is the starting point for numerous traditional marbling designs.

Print the Fabric

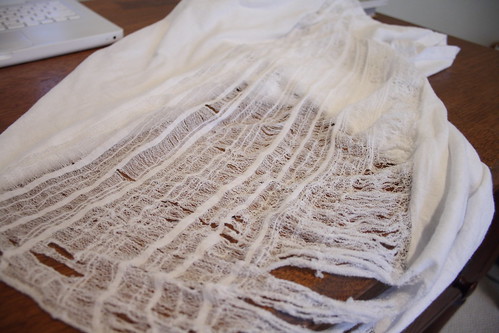
Center your fabric over the size, holding the dowels up to achieve a droop in the middle, as shown in the photograph below. Starting with this droop, lay the fabric onto the paint, lowering the ends in one continuous motion. (If you're working with a partner, you can each hold two corners of the fabric, and lower it in unison.)

Lowering Fabric
Onto the Size

Allow the fabric to rest on the paints for a moment, then drag it over an edge of your tray. The scraping motion removes excess size from the fabric.
Rinse the fabric thoroughly in warm water and wring it gently. Take a look at your print. Is the contrast good ? Are the color combinations pleasing? With every print you make you will probably see ways to improve the next. Hang this piece to dry and print another. First, blot excess paint from the size by placing a sheet of news paper on top of it. Drag the paper across one edge of the tray. Don't worry about paint that sinks below the surface of your size. Even though the buildup eventually makes it difficult to see the true value of colors as you place them, it will not interfere with your current color scheme or design. Eliminate air bubbles if necessary before laying paints.
For your second print, you might want to try the 'nonpareil' pattern. Lay your paints on the size again, and comb to create the get gel pattern. Now place your 1/4-inch comb at the top of the tray and pull it downward through the size. This creates the traditional nonpareil pattern.

Setting the Paints

To set your paints, iron the back of each piece of fabric for a few minutes at a medium setting, or follow the paint manufacturer's instructions. The marbled fabric should now be treated as you would other quilting fabrics. It's best to rinse the fabric one more time, or even wash it lightly, to be sure that all alum is removed.
Remember, when ironing any fabric that contains alum, it's really best to use a different ironing board, or place a few thicknesses of muslin on top of your "good" cover.

Labels: , , ,